How to do a hardware manicure at home

You've probably seen small manicure machines with a wide variety of attachments in hardware stores more than once, and you've had the idea of buying one for yourself. Often everything ends with this thought, because “you need to be able to do this”, “I’m not a professional” and “what if I mess something up again”. In fact, it’s only at first glance that everything seems so scary and complicated. Just after reading this article, you will be able to do your own manicure completely calmly at home.
Contents
If you went to a manicure master's course, then first of all you would be asked to choose a type manicure which you would like to learn: classical, European or hardware, for which you need the machine mentioned above.
Hardware manicure lessons for beginners
Hardware manicure is a type of European unedged manicure, but, unlike which, the cuticle is not pushed back with an orange stick, but is ground down using a rotating attachment on a special device.

Despite the fact that hardware manicure is considered the safest, if you purchased such a device for home use, you should still learn a few basic points, no matter how simple the operating principle of this machine may seem.
- Hardware manicure is a dry type of manicure. It is carried out only on dry nails!
- If you didn’t skimp and purchased a device that has a setting function, then there is no point in setting the rotation speed to more than 10,000 revolutions: your nails will simply be ground into powder, after all, you are just learning the basics of being a manicurist. That is why there is no point in such a device for you yet.
- Do not lean the clipper on close to your nail. And especially don’t press it on your nail.
So, the device has been purchased and is ready for use, hands and nails are absolutely dry and grease-free:
- Using an orange stick, push the cuticle as close to the base of the nail as possible.
- Use a medium-hard brush to remove cuticles and treat the pads along the nail plate (the area of hangnails).
- Use an attachment with a small ball on the end to remove dead dead cells from your fingers.
- But use cutters in the shape of a cylinder or trapezoid with great care for nails to give them shape. Don't overdo it; ideally, the free edge of the nail should be at least 1-2 mm.
- Start polishing; for this purpose, your kit contains a soft nozzle, usually it is light in color. Without stopping in one place, move the middle of the cutter along the surface of the nail plate, carefully so as not to scratch it.
- Brush off the dust from your nails with a soft brush and start painting or applying gel polish.
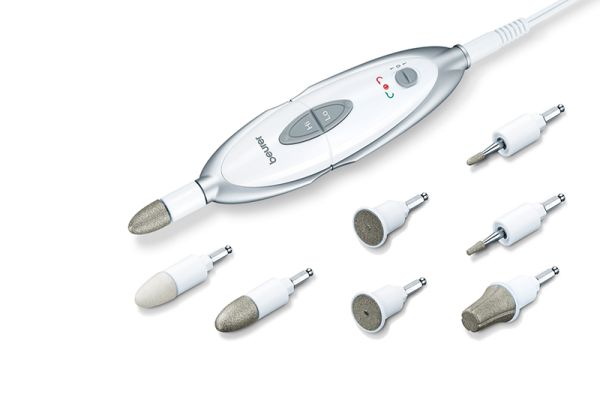
What devices and cutters are needed for hardware manicure
It’s not for nothing that your set contains a lot of attachments - cutters, and if the attached instructions suddenly did not contain a description of each of them, then we will tell you about the most basic ones, which are quite enough for performing a hardware manicure at home:

- Ball-shaped bur. It is not used for nails, but for treating the skin around the nail and removing hangnails.
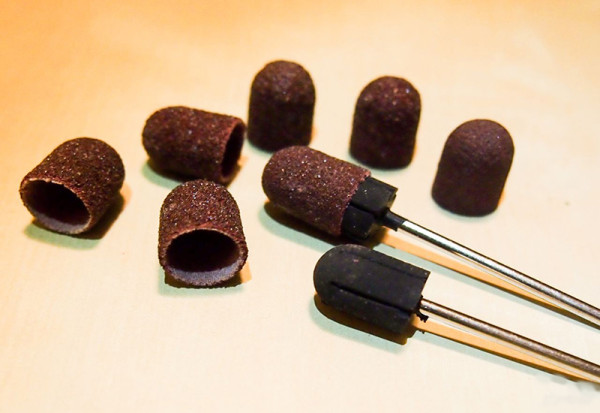
- Disposable drums (at the edges) and a metal attachment for attaching them. In salons they are often used for pedicures; it is considered unhygienic to use the same drum for several different clients. They are used to remove rough skin on the toes and sometimes on the hands, and to trim thick nails.
- Polisher. Always soft, no matter what material it is made of. Salons usually use several polishers of different hardness, but for a home set, one, the softest one, will be enough for you. When working, under no circumstances should it be held in the same place for more than 1 second.
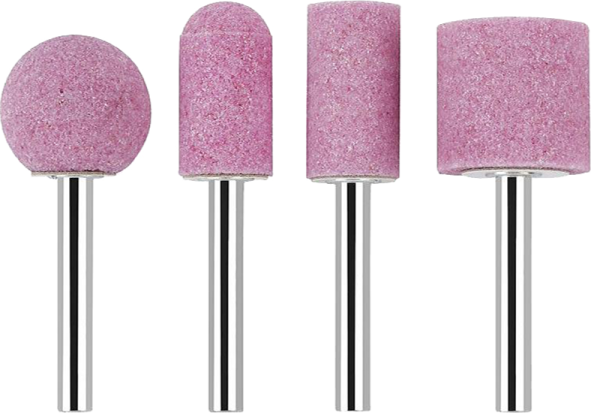
- Cylinders. They are very different in size, in one set there can be 10 of them at once, but one or two will be enough for you at home. They are used to file nails, give them shape, create designs, etc.
How to choose a successful device
Price of devices for manicure varies not only depending on the number of attachments, but also on the material from which they are made. Most often you can find three options in stores.
- Diamond. More precisely, coated with diamond dust. The most expensive, but also the most successful for working with delicate skin and thin nails.
- Ceramic. The most common ones, usually in different colors, are used for both hands and feet - harder than diamond cutters. They vary in hardness and grain size.
- Silicon carbide. The most affordable and quite suitable for beginners, although they are considered disposable. Often used in salons for rough skin around nails, corns and calluses.