How to make a beautiful manicure at home

The hands of every self-respecting woman should always be well-groomed, and manicure plays an important role in care. It’s no longer easy to count how many different types of designer nail art and simple manicure there are, but there’s nothing difficult about doing it yourself, at home. Read our article about how to make your nails unique.
Contents
How to do a hardware manicure at home

Manicure machine
The name speaks for itself. For this type of manicure, you will have to buy a special device, the set of which contains various types of attachments for your purpose. This is very convenient, since caring for your nails will not take up a lot of time, which is already short. The cost of a manicure set is quite affordable; depending on the number of attachments and its power, you will have to pay from 1,000 to 5,000 rubles for the device. If you want to ultimately get the perfect result, give preference to the device with the highest number of revolutions.
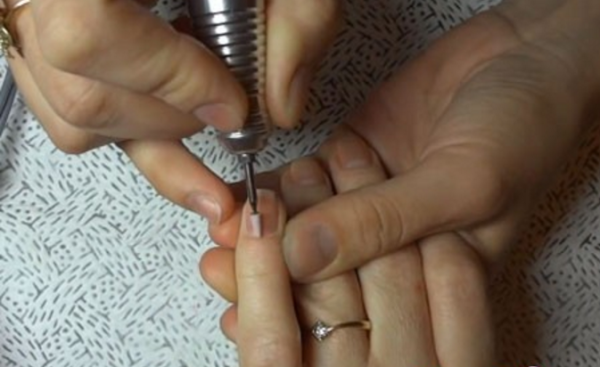
To begin with, the skin of your hands is treated with an antiseptic; if necessary, you can use a degreaser. Further, everything is point by point.
- Give your nails the desired shape. To do this, you can use a regular nail file, or you can use a special attachment in the set.
- Rough cuticles and ridges on the sides of the nails should be tidied up using the cone-shaped nozzle from the set. Don't put too much pressure on your nails or skin, just move it gently back and forth. Otherwise, you will harm everything you touch. When doing a manicure, move from left to right, lifting the skin at the base of the nail and moving it away.
Hardware manicure at home
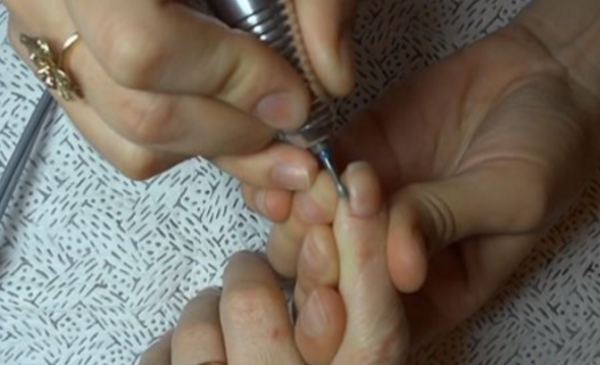
Observe the angle at which you hold the nozzle - it should be exactly 45°. Don't stay in one place for too long. The speed of the device should not exceed 5,000.
- Then, when the cuticle is raised, it needs to be removed by moving the device in the opposite direction - from right to left. At this moment, the nozzle is almost completely adjacent to the skin. The working hand must be fixed in one position, otherwise there is a risk of getting a lot of scratches on the delicate skin, which will make the manicure sloppy.
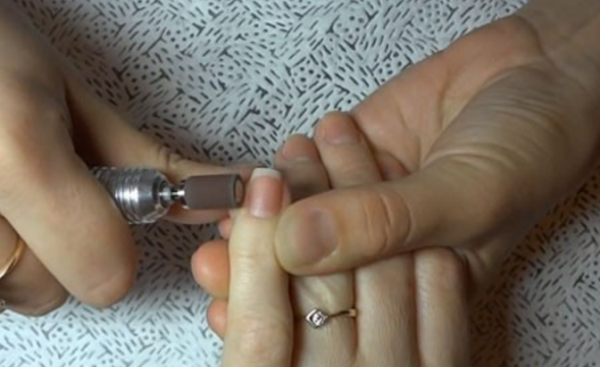
- Coarsened areas on the nail ridges and its sinuses lend themselves perfectly to the spherical nozzle of the device. Move it over problem areas and they will all smooth out.

Hardware manicure at home
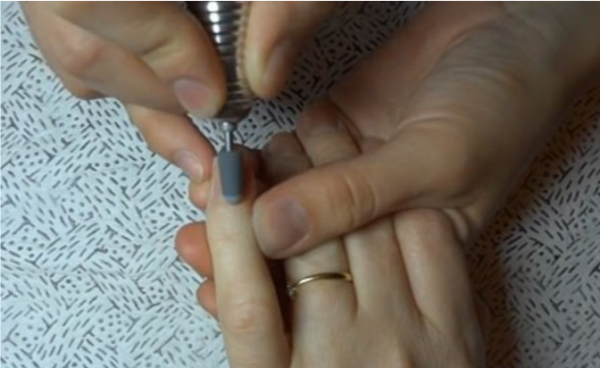
- Using an egg-shaped nozzle, clean off any remaining epithelium on the side rollers.
Hardware manicure at home
- On particularly rough areas, especially if there are calluses on your hands, use the drum attachment. The rotation speed should not exceed 2,000 rpm. Excessive rotation with such a nozzle may cause harm to delicate skin. Do not press, do everything calmly - then with the help of the drum you will get a beautiful treated area around the nail.
Hardware manicure at home
- Finally, sand the surface of the nail with a felt cutter. With its help you can smooth the surface of the nail and remove yellowness, which seriously spoils the aesthetic component.
Hardware manicure at home


This concludes the procedure for hardware manicure at home. To reinforce what you have read, we recommend watching a video where everything is clearly and clearly shown.
How to do a gel manicure

Manicure with gel polish
Gel manicure is a guarantee of a long-lasting effect of well-groomed nails, which will last up to three weeks. But for this to really be the case, you need to do the manicure itself correctly, strictly following the entire sequence of actions.
- Give your nails the desired shape. Clean the surface of the nail from dust and dirt.
- Remove the cuticle.
- Remove the topmost layer of the nail with a coarse abrasive buffer. You only need to remove the top, glossy layer. The surface of the nail should become matte. However, you should not be zealous so as not to damage the nail itself and leave scratches on it.
- Dry and degrease the nail surface using a special product or nail polish remover.
- For better adhesion and protection, apply a primer (base coat) to the nail. This should be done in two thin layers, each of which is dried under a UV lamp. Apply the base using rubbing movements: from the end to the cuticle, without affecting the cuticle and the side rollers.
- After this, colored gel polish is applied. This can be done in one layer, to obtain a translucent tone, or in 2-3, for a more saturated effect. Apply very thin layers so that the composition does not bubble during drying.
- Once all layers have been applied and dried, proceed to the topcoat. It will provide a glossy shine to the nail. Cover everything and dry under the lamp.
- Finally, remove the sticky layer from the nail using a special compound and a lint-free cloth.
That's all, enjoy your neat and beautiful nails!
How to do shellac manicure at home
A little earlier we have already touched on the topic how to create a manicure using shellac at home. There are no particular differences in the procedure for applying gel polish and shellac. The entire sequence of actions and application rules are absolutely identical, with the exception of one “but”. When preparing nails for shellac, the surface of the nail plate is only slightly filed and not ground down. In this case, shellac, of course, wins. Even with regular procedures, the nail does not thin out as much as with gel polish.
How to do a French manicure
French manicure is a timeless classic that will probably never lose its relevance. It is with a French coat that nails look very neat, well-groomed and suitable for everyday use with any outfit. At the same time, doing a French manicure is very simple - you just need to buy a few necessary elements, or a special set, the cost of which is a penny.
For convenience, it is advisable to purchase special stencils that will create a clear smile line on your nails. They are very cheap, but the results will be excellent. Moreover, the shape of the stencils can be completely different, starting from the classic (smile) and V-shaped, ending with zag-zag. The final choice is yours.

Stencils for French
You will also need a base varnish (transparent pink or beige shades), white varnish and colorless.
- First of all, the nails need to be brought into human form: remove the cuticle, polish, remove all burrs and give shape.
- Then, apply the base to the prepared nails: varnish, the color of which you chose yourself. Let it dry.
- Paste the stencil along the smile line, or so, if the shape is different, so that the part of the nail extending beyond the area of the pads is subsequently covered with white varnish. Glue the stencil carefully so that when applying white varnish the latter does not flow where it is not necessary.
- Afterwards, carefully apply white polish to the top of the nail and let it dry. If necessary, apply 2 coats.
- As soon as the white layer has dried, carefully remove the stencil.
- Apply a final coat of white polish to give your nails a glossy shine.
That's it.

French manicure at home
If you have everything at hand except stencils, it doesn’t matter. For the latter, you can use regular tape, which needs to be cut to the shape of the nail. Yes, it’s a little tedious, but if you really want it, then this is the real way out.
You can also try doing a French manicure without using tape or stencils by painting the white part of the nail with your own polish. Many, by the way, do this all the time and do it deliberately so as not to waste money on such a trifle.
How to do a mirror manicure at home

Mirror manicure
An unusual, but very beautiful manicure option that sparkles especially incredibly under the rays of the sun. It is not so easy to do, but the result is worth it. To create a “Hollywood” manicure you will need:
- base coat;
- special nail glue, which is sold in a tube like regular polish;
- foil for nail design;
- orange stick;
- nail file;
- colorless varnish.
- First of all, prepare your nails: file and degrease.
- Then apply the base coat in a thin layer and let it dry.
- Spread a very thin layer of glue over the nail and let it dry slightly until it becomes sticky.
- Carefully place the foil over the nail and with light movements begin to press it to the surface of the nail plate. Be very careful not to create any bubbles or lumps. However, if this does happen, direct the hot air of a hairdryer onto your nails and, under its influence, straighten out all the unevenness.
- As soon as everything is smoothed out, with a sharp movement, holding the free end, tear off the foil on the sides. If necessary, file off the excess foil at the very end.
- At the very end, apply a thin layer of colorless varnish to your nails. As soon as the last one dries, the mirror manicure is ready.
How to do a moon manicure at home

DIY moon manicure
- Fix a stencil on the nail that clearly separates the hole.
- Apply the nail polish of your choice to the top surface of the nail.
- As soon as the layer dries, you can remove the stencil and begin drawing the hole. To do this, use a thin brush to paint the free area of the nail with a different color of varnish.
- Apply topcoat in the form of clear varnish.
There is another technique with which you can perform a similar manicure yourself. It is clearly shown in this video.
How to do a water manicure at home

Water manicure at home
- Pour water into a small glass.
- In the very center of the glass, start dripping varnishes of different colors that you like one by one. Multi-colored circles will form on the water. Drip until the circles stop spreading.
- Using a stick (you can use a regular toothpick), start moving it across the water surface, creating a random pattern.
- Once everything is ready, slowly lower several fingers at once so that the polish sits on the nail.
- Remove your fingers from the water.
- Remove excess polish that will be on the skin and correct any imperfections with a cotton swab, after dipping it in nail polish remover.
- Repeat with all nails.
How to do an ombre manicure at home

Ombre manicure at home
- Apply the base color as the first layer and wait until it dries completely.
- Take a small piece of a regular sponge (it’s better to take a cosmetic sponge, it’s not so porous). Apply small strips of varnishes of different colors onto the sponge, which will blend into each other.
- To avoid getting your fingers too dirty, first lubricate the skin around the nail with a face film mask, which can then be easily removed along with excess polish.
- Using light pressure movements, begin to touch your nails with the sponge until the desired effect is achieved.
- Remove excess varnish with a cotton swab, or remove the film if you worked with it.

