Jacket for girls: master class with step by step photos

We continue the topic of articles on sewing children's clothing. Earlier I brought detailed master class on sewing a children's skirt with wedges, which is sewn very simply and quickly. In this article, I propose to sew a blouse for a girl that can be worn at any exit. In time, its sewing will take a little more, but the result is worth it. Consider all sewing from the moment the pattern was built.
Pattern of a sweater for a girl
To build a drawing, you need to know:
- Chest circumference.
- Waist circumference.
- Back width.
- Chest width.
- Back waist length.
- Front waist length.
- The size of the shoulder slope.
- The length of the product.
- Armhole depth.
- Sleeve length.
My pattern is built for size 110-116. So let's get started.
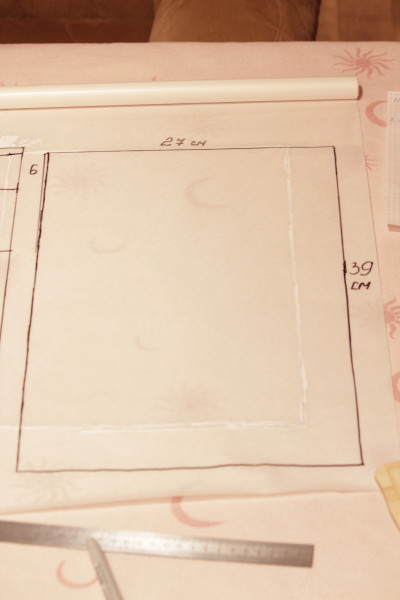
- Draw a rectangle, the width of which will be the half-girth of the chest + the increase in the freedom of the fit. Take the latter at your discretion, if you want more freedom - take more. I made an increase of literally two centimeters, since the fabric from which the blouse will be sewn is very elastic. And the height of the triangle is a measure of the length of the product.
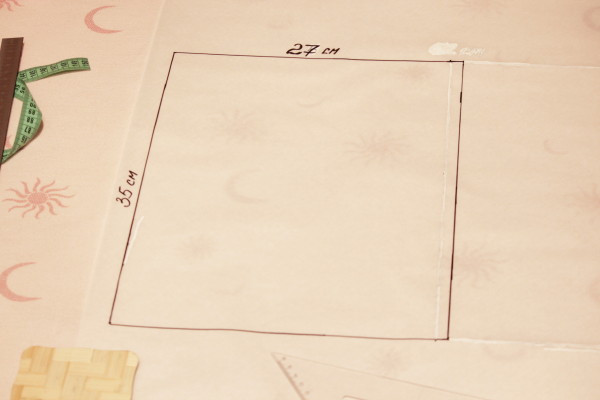
- Next, measure the depth of the armhole and waist (along the back) from the top. Draw horizontal lines.
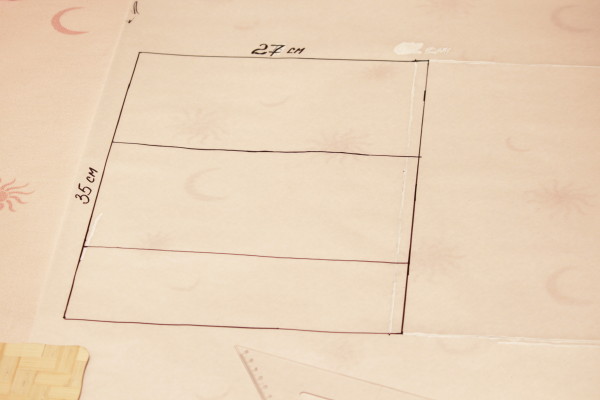
- On the armhole line from the left side of the pattern, measure half the back width measurement and draw a vertical line. On the right side along the armhole line, measure half the width of the chest and also draw a horizontal line upward. Do not forget to take into account the freedom of fit measurement that was made in the beginning.
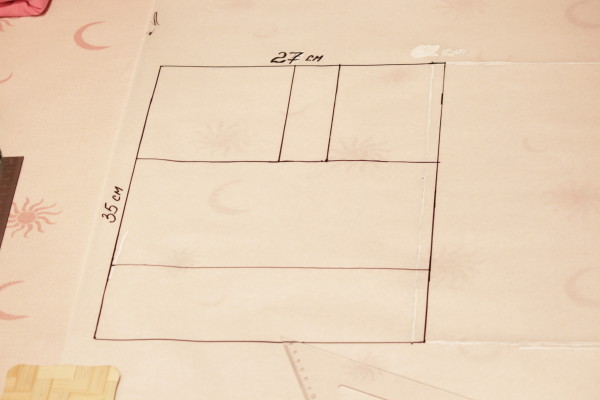
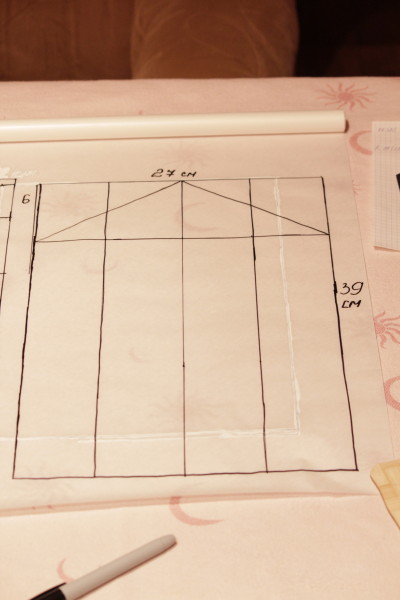
- Divide the armhole by 2 and draw a vertical line from the point of division to the bottom of the product. We build the back. From the upper left corner, measure 6.5 cm to the right and raise the point by 1.5 cm. Along the line of the armhole, lower it 1.5 cm. From the sprout through point 1.5 on the armhole line, measure the shoulder.
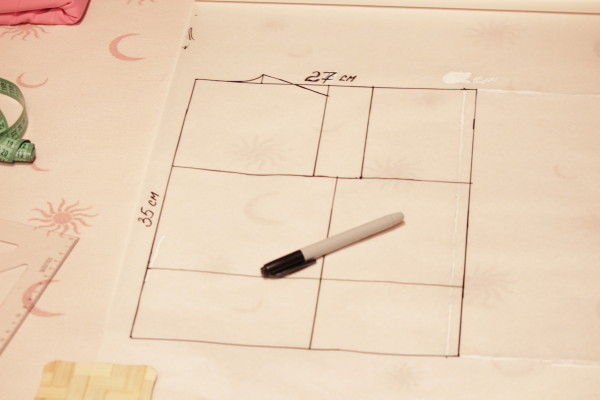
- Now a little bit ahead. On the right side of the pattern from the waistline, measure the length of the front waist. Extend the vertical line of the front armhole so that it connects to the raised line of the front waist measurement. From the upper right corner to the left, set aside 6.5 cm and 6 cm down. Connect these points with a smooth line to form a neckline. Along the horizontal line of the front armhole, back down 3 cm. Starting from the top of the neckline through point 3, draw a line of the shoulder.
- Divide the armhole line of the back into 2 equal parts, and set aside 2 cm from the corner of the armhole at an angle of 45 °. Divide the armhole line of the front into 3 equal parts, and also retreat 2 cm from the corner. Everything is clearly visible in the photo.
- Draw the back armhole through the shoulder point - the division point - point 2 - the point of equal division of the armhole. The front armhole passes through the shoulder point - the lower point of division - point 2 - the point of equal division of the armhole.
- If you want to leave the bottom straight, then the basic construction of the pattern ends there. I decided to make the bottom elongated towards the back. To do this, I lengthened the center of the back by 6 cm and drew a smooth line from the center of the front to the center of the back.
- Next, you need to build a sleeve. We make a rectangle. Measure down the length of the sleeve (by measure). To the side: (1/3 chest girth + 5 cm) * 2.
- The height of the sleeve ridge is calculated by the formula: 3/4 of the armhole depth - 1 cm. Draw a horizontal line of the ridge height. Divide the sleeve into 4 equal parts with vertical lines. From the very center of the top, draw lines to the base of the ridge.
- Divide each segment in half, measure perpendicular to the measurements shown in the photo (for all sizes) and draw smooth lines.
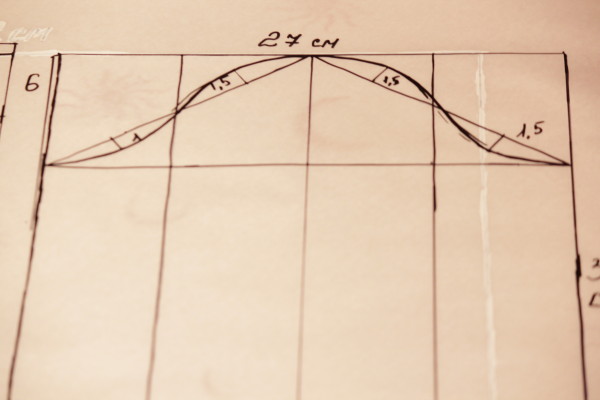
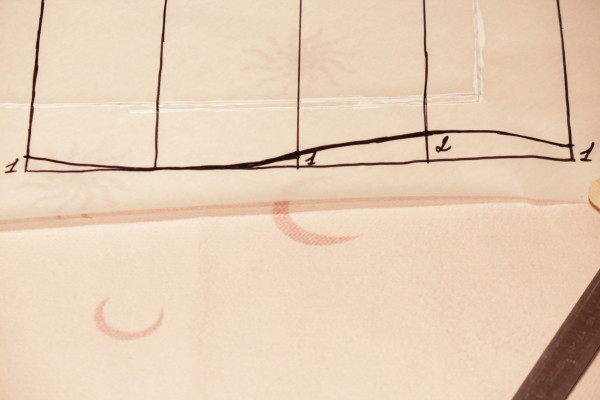
- Decorate the bottom of the sleeve as shown in the photo.


That's all, the pattern is ready! You can start cutting and sewing.
Jacket for girls: step by step
For work, I decided to choose knitwear - it stretches remarkably, drapes beautifully and, in general, is one of my favorites. You can take any other material you like.
In the classic version, you will need 80 cm of fabric, with a width of 150 cm and a spool of thread to match. Let me remind you that this consumption of material is used for a size of 110-116 cm. Additionally, you can take decorative elements, which later "revive" the look of the blouse. For me it will be large and small beads and lace.

Cut out all the details: 2 halves of the back, 2 sleeves, 1 part of the front.

In the process of work, I decided to lower the center of the backrest a little. To do this, I split both parts with the front sides inward, drew a new neckline and cut off the excess. In my opinion, it's prettier this way. If you decide to do the same, then do not forget to reduce the shoulder line from the neck of the front, otherwise there will be inconsistencies when sewing the shoulder lines.

Now fold the back and front parts "face" inward and sew along the side seams and shoulders.

Let's immediately make the sleeves as the most laborious. Measure the child's wrist, take a couple of centimeters to its width for freedom and seam allowances. Decide on the width of the cuffs and cut out rectangles twice as wide as intended + seam allowances.
 Fold them face in with short sides and sew.

Sew on the sleeves.

Zigzag the hem of the sleeve, loosen the tension on the machine and set the maximum stitch length. Pull the sleeve slightly so that it is convenient to sew on the cuffs.

Turn the cuff so that the seam is inside. Pin them on the sleeves and sew on. Such a beautiful "flashlight" is formed.

Pin the sleeve to the armhole of the blouse. At this stage, the main thing is not to confuse the front and back of the sleeves.

Further, if you want, arrange the bottom of the product. Lace went to me for this role. Pin them and sew them on.

After that, pin and close the back of the product with a seam. Do not literally reach a centimeter and a half to the neck.

The neck can be pulled off a little, so it will look neater. It is convenient to do this with the same zigzag stitch on a typewriter.
 Let's start building and sewing a kind of collar. Measure the neckline around the entire circumference. Add 40 centimeters to the risers. Cut out a strip equal to the measured length, taking into account the free ends for the tie and 5 cm wide + seam allowances.
 Fold it "face" inward, pinch and fold in half. Measure 1/2 of the neck width from the center. Duplicate the measurement on the other side.

Sew the tape on both sides, leaving the center open. Turn the collar out.

With the open side, attach the collar to the neck of the garment with the right sides so that the free ends look back and sew.

I decided to decorate the neck with beads and beads of different sizes. In my opinion, it looks original. Unfortunately, the photo is not able to convey that beauty.
 And this is what we got in the end. An interesting blouse for any exit!

Wish you creative success and straight stitches!

