"Short cut": Nail extensions

On a holiday, and on weekdays too, every woman and girl wants to look her best. This is especially true for makeup and manicure. However, not everyone can grow long beautiful nails - the work dress code does not allow it, or the nails simply break and peel. In this case, nail plate extensions can help out.
Contents
What you need for nail extensions 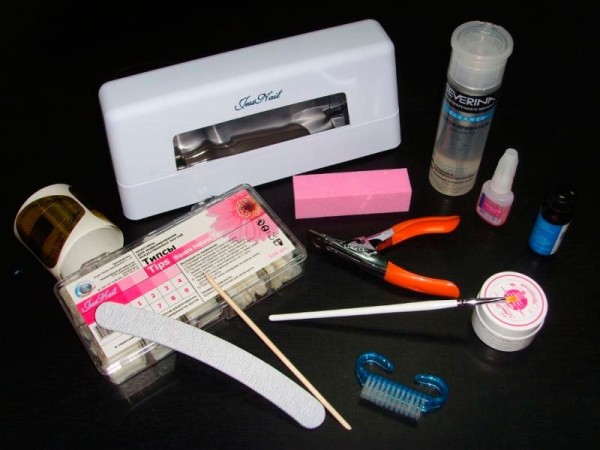

There are several types of extensions, the most basic are extensions on forms and extensions on tips. For the first, acrylic and gel coating may be suitable; for the second, gel is most often used.
What is needed for this procedure:
- forms or types;
- glue for gluing tips;
- lamp for polymerization of the composition on nails, it is best to use a simple one with a timer;
- acrylic or gel;
- flat brush for nail modeling;
- nail files, buff;
- lint-free napkin;
- tip cutter or cutter, necessary for cutting off excess length of tips;
- dust brush;
- disinfectant or antiseptic.
The gel requires a primer or base, gel, liquid for removing the sticky layer, and a topcoat.
For acrylic - acrylic powder of the desired shade, from transparent to peach, acrylic liquid.
In addition to the basic supplies, you will also need: manicure scissors, orange sticks or pushers, cuticle oil and all sorts of things for decorating long nails.
Acrylic nail extensions 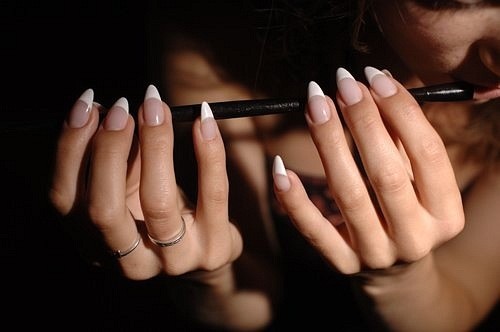

It is believed that acrylic extensions are the most durable and strong. But, as they say, everyone has their own tastes and preferences. For such extensions you will need acrylic powder and a special liquid - these are the most basic devices. You will also need an antiseptic for treating hands and nails to avoid various fungi and infections under artificial nails, a dehydrator for drying the plate and better adhesion to acrylic, a primer, used as a “primer” for the base layer. In addition - brushes, forms for extensions, they are disposable from thick paper and reusable from thick foil with clips, a nail file, a buff, a lid for mixing acrylic components.
The big advantage of acrylic is the rapid hardening of the material without the use of a drying lamp. And when adding extensions, you can immediately do a French manicure; you just need to use acrylic powder of the desired shade for the tips of your nails. But there is also a minus - many people may be allergic to acrylic components, because they have a very specific, not very pleasant smell. For acrylic nails, it is best to use files with high rigidity, since acrylic is a fairly durable material and a soft file with a buffer may simply not “take” the coating.
Very often acrylic extensions are used for exhibitions and shows. Then they make very long nails on the model. And on the nails they can make three-dimensional sculpting - flowers, animals and even entire paintings on all nails.
Gel nail extensions 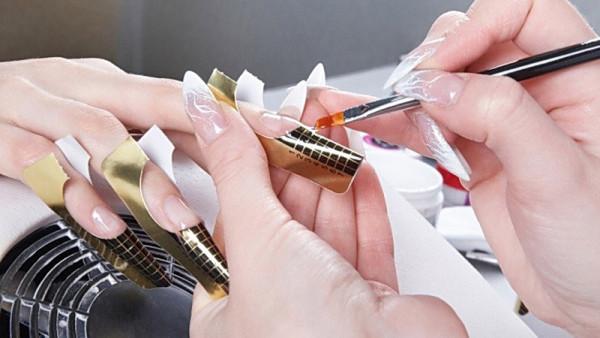

Gel is considered the simplest material, especially for those who are just beginning their acquaintance with the basics of nail art. True, for a good build-up you will still have to practice a little and get better at it.
For gel nails you need: gels of different shades (transparent, pink, peach, camouflage), tips or forms, glue for tips, base, topcoat, antiseptic, primer and dehydrator. Gel brushes – square, rectangular, or pointed at the end, any, but always hard.
Gels do not have an unpleasant aroma, unlike acrylic components, so the gel coating has many more fans. It is also believed that gel extensions give more natural nails, they are thinner, similar to the shape of your own nail.
Nail extension: step by step 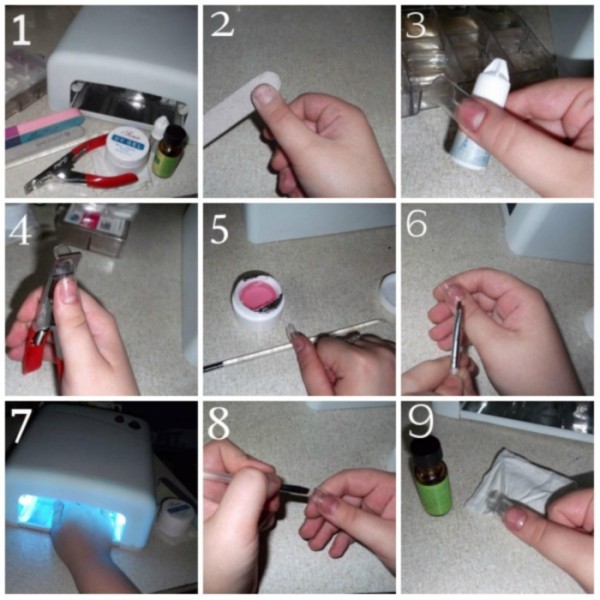

So, first you need to choose what you will do the extensions for. According to reviews from many manicurists, many are still more inclined towards forms for extensions. It's much simpler and lighter than tips.
- The first step is to remove the old coating from the nails, treat the nail plates - remove the length, make the same shape for all nails, and sand them with a buff.
- The second step is a manicure, any one, depending on your preferences. Today very popular: hardware, combined and Japanese. Don't forget about the benefits for your own nails - add essential oil or sea salt to the bath.
- After treating your nails and fingers, you can move on to the most basic. First, let's look at extensions into tips.
- Tips must be selected for each finger so that the plate fits tightly when in contact with the natural nail. The natural plate is coated with a primer. Now each tip is glued to the nails using high-quality glue.
- After the plates have frozen in place, they can be cut with a type cutter depending on the chosen length.
- Using a file, you need to make the desired shape for future nails.
- Prime your nails again with primer.
- Mix a small amount of acrylic components and apply with a brush to the tip.
- After the acrylic has hardened, process the nail - level the sides, tips and surface.
- The final touch is applying the topcoat, drying it in a lamp and decorating the nails.
Gel extensions on forms - after manicure and nail treatment, you need to fix the forms on the nails. The paper form is inserted as needed under the edge of the nail and secured.
- Apply a middle layer of gel to the mold, whatever length you want. Dry in a lamp.
- Remove the forms, file your nails and give them the desired shape.
- Next, another layer of gel is applied and dried in a lamp.
- After all the manipulations, you can start decorating your nails. A top coat is applied to the finished drawing or jacket and dried in a lamp, after which the sticky layer is wiped off with a special product.
Extension onto forms with acrylic is quite similar, only here it is necessary to distribute thick acrylic over the entire nail plate and forms. Approximately 2-3 layers are applied, after which the shape and length are cut out.
Nail extensions at home 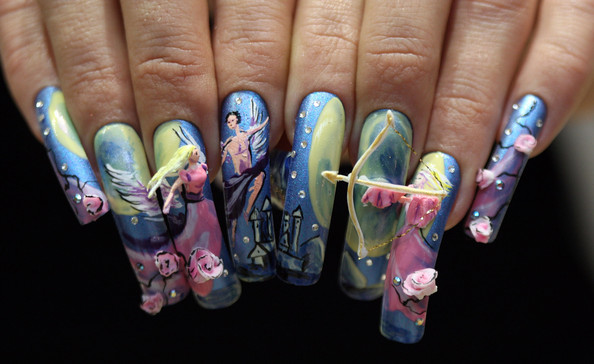

To understand what and how it is more convenient to do nail extensions at home, you need to try each option at least once. Then weigh all the pros and cons and choose the best, most convenient and shortest method for yourself. But if your nails are very short, right at the root, then you won’t be able to use forms; the best option here is tips. For forms you need at least a small free tip of natural nails. And it’s much faster to grow nails using tips than fiddling with forms.
To clearly know what and how to do, it is better to watch various videos with step-by-step instructions before the procedure. This way you will learn better and know what and how to do. When doing extensions, it is best to first do four nails on each hand, and only then move on to extensions of nails on the thumbs. After extensions, you can simply cover your nails with simple varnish, or make a beautiful decor - drawings, sculpting, rhinestones, glitter and much more.
Care for extended nails 

In order for your new long nails to remain as beautiful for a long time, you need to take care of them and follow some rules.
- After the extension procedure, it is not recommended to wet your hands and nails for four hours; you should not visit swimming pools and baths for 24 hours.
- When using acrylic extensions, you cannot use products containing acetone; the latter can easily “corrode” a brand new nail.
- Handle your nails carefully - don't pick at anything, don't hit your nails on the table or walls, don't use screws, new nails are easy to break.
- When cleaning and using cleaning products, it is better to do all work with rubber gloves.
- Correct your nails on time, about once every three weeks.
- If you have had your nails extended by a specialist, then contact him for correction or removal of nails. No independent actions, otherwise you can seriously harm your natural nails.
Nail extension: photo 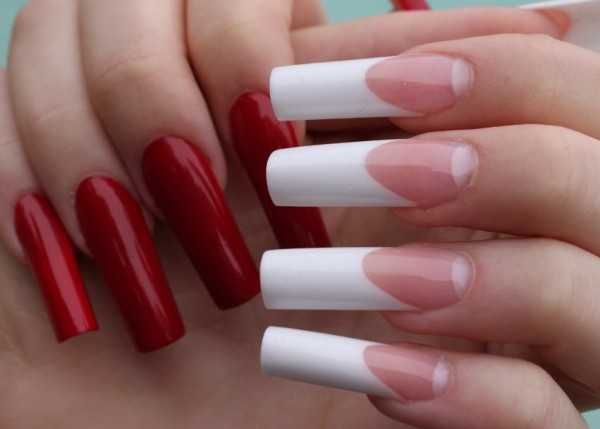


Nails after extensions
Since extensions are still an artificial process, after removing the non-native nail plates, your own ones may be in very poor condition. Yellowness of the nail plates, unevenness, bumps, spots on the nails, thin nails - all this is the result of artificial beauty.
Rarely does anyone manage to avoid these problems, so in order to make your nails look healthy and beautiful, you need to take care of them. While wearing nail extensions, do not forget to moisturize your hands and cuticles.
After removal polish the nail, removing uneven spots and unsightly spots. Baths with salt and lemon juice will help get rid of yellowness; you can also simply cut the citrus fruit into two parts and dip your marigolds in them for a few minutes. Nails, like skin, need hydration and nutrition, so take baths with oil esters, massage with natural oils. Baths with salt and various herbs will also help.
You can lubricate your nails with nourishing cream and wrap your hands in cellophane for a few minutes. Castor oil and burdock oil are good for strengthening and growth. To keep your nails strong, do not forget to take calcium, vitamins, fish oil or brewer's yeast.
If you are a fan of going to beauty salons, you can take a course of paraffin baths, hot manicure and sealing your nails.
When doing extensions for a long time, do not forget that your nails need rest. That is why it is recommended to remove fake nails once a year, or better yet every six months, and give your natural nails a rest. During this time, your nail plates will get stronger, become healthier and stronger.
If, after removing the extensions, you find curvature of the natural nail plate, chemical burns or fungus, then immediately consult a doctor so that he can examine the problem and prescribe treatment for you.
Nail extensions: reviews
Judging by the reviews of women and girls, we can conclude that extensions, although a little outdated, are still popular with many. This applies to those who find it difficult or simply too lazy to grow their natural nails, as well as those who have thin and flaky nails. Many people write that it is faster and more convenient than growing your nails. In addition, you can quickly get used to long extended nails and they are much stronger than your own.
Nail extension: video

