How to do an unedged manicure

The first thing everyone pays attention to is manicure on women's hands. Therefore, frequent manicure procedures are very important to ensure that the hands remain well-groomed, beautiful, without hangnails and overgrown cuticles. In this article you will learn the advantages of the European procedure and its step-by-step execution.
Unedged manicure at home 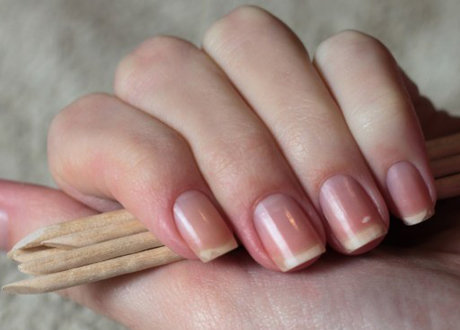

European manicure or, as it is also called, unedged, differs from the others in that the skin around the nail is pushed back with an orange stick, rather than cut off with nail clippers. At the same time, the nail itself is polished, polished, and the nail is softened using special products. At the moment, quite a large number of representatives of the fair sex have switched to this type of manicure and are increasingly giving preference to it. Why? This procedure has many advantages:
- unedged You can do a manicure yourself at home;
- suitable for sensitive skin;
- much safer than edged, since you cannot cut off anything unnecessary and introduce any infection;
- there is no pain;
- Great for men and teenagers;
- manicure does not damage the surface and root marigold;
- cuticle softeners only act on dead cells.
True, there are several small drawbacks, for example, if your nails are very neglected, you have hangnails, and you have trimmed them before manicure, then a European manicure will be ideal only after 6-7 procedures. If you have burrs, you will still need to use tweezers.
European manicure is divided into three main types:
- hot – before the manicure itself marigolds needs to be placed in a bath with oils;
- wet - the skin is softened with warm baths;
- dry - the hands are not moistened with any liquid, and the cuticle is moved in a dry state.
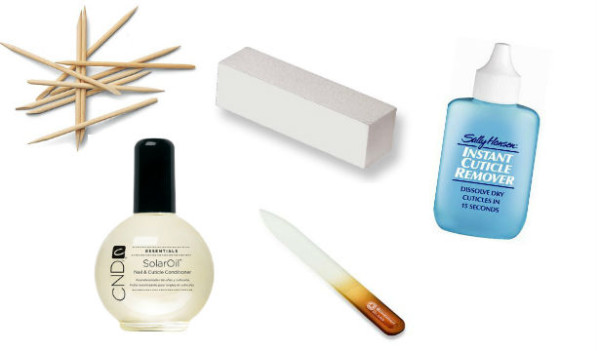

Experts recommend doing wet unedged procedure, as it is the safest, easiest and most convenient. For it you will need: liquid for removing varnish, wooden sticks, a bath of water (adding sea salt, various herbs and essential oils, you will make it much more efficient), towel and napkins, buff for polishing nails, file, special liquid for softening cuticles, cuticle oil, cream, strengthening varnish for nails, colored varnishes, gel polishes and various things for decoration.
Unedged manicure step by step 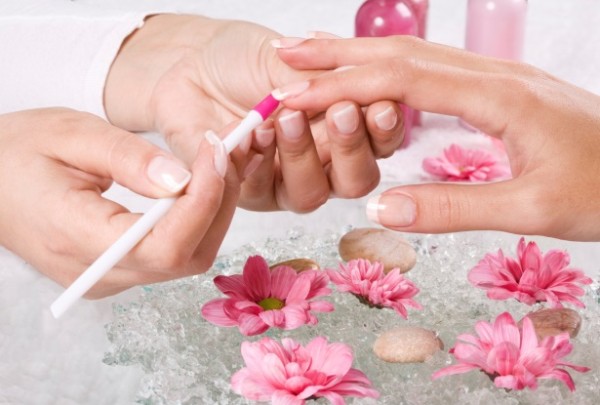

You have already learned the positive and negative sides of European manicure, what is necessary for it. Now you can move on to step-by-step instructions on how best to do what and in what order.
- First, the surface of the nails must be cleaned of any varnish coating.
- Using a nail file, give all nails the desired shape.
- Next buff lightly sand the nail plates.
- After making a warm bath with your favorite products and herbs, soak your hands in it for 6-7 minutes.
- When the skin has steamed, you need to wipe your hands dry. And apply the emollient to the cuticle and skin around the nail plate. This product most often contains lactic and fruit acids. You can replace it soda baths.
- After keeping the softener on the skin for a few minutes, you can remove it with a napkin. Moving towards the side rollers, gently move the cuticle using a wooden stick.
- After the procedure, you need to rub a special oil into the cuticle with massage and gentle movements. Next, lubricate your hands with nourishing cream.
- Lightly sand your nails again buff. After this, you can apply any coating you choose.
The entire manicure session lasts about half an hour. For perfect hands, the procedure must be performed a couple of times a week. If you do manicure independently, it is better to wet your hands and process them one by one, because it is much more convenient when the working hand is dry. It should be remembered that allergic reactions can occur to various manicure products, so it is best to first test all the components you purchase.
Unedged manicure: video
For a more detailed study of this type of manicure work, we suggest you familiarize yourself with the videos below.

