Pattern the basis of the dress: step by step instructions
The dress base pattern is a tool with which you can model a dress of absolutely any style. This article provides step-by-step instructions on how to build a basic pattern, make a sleeve model, and also provides an example of modeling based on the resulting drawings.
Content
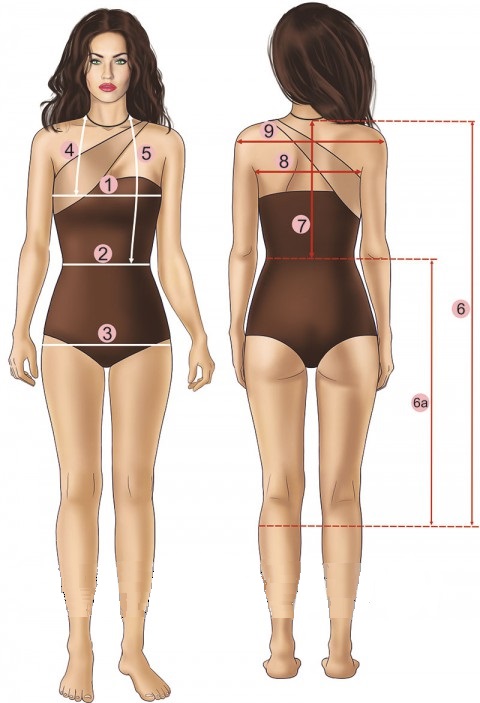
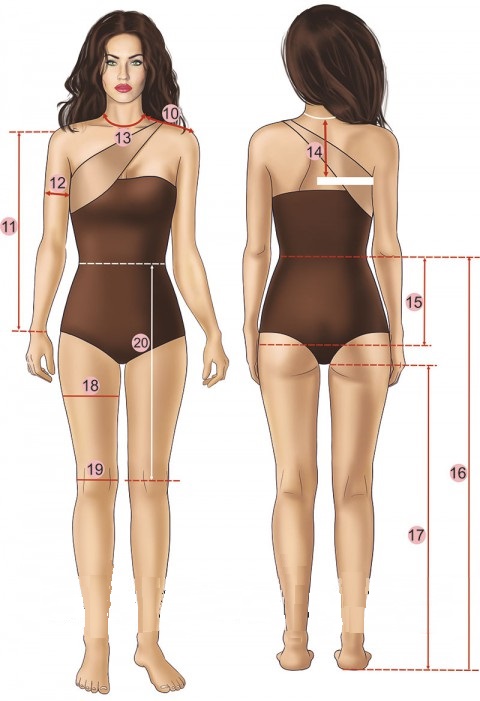
Measurements for dress
To create a pattern you will need:
- length of the product;
- back length to waist;
- shoulder length;
- half-girth around the neck;
- half-girth above the chest (removed over the chest);
- half-girth on the chest;
- half-girth at the waist;
- half-girth on the thighs;
- the size of the armhole height.
Building a pattern for the basis of a dress
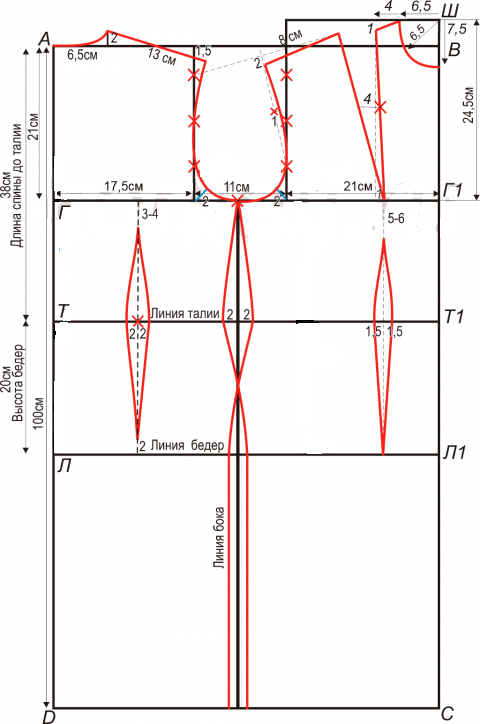
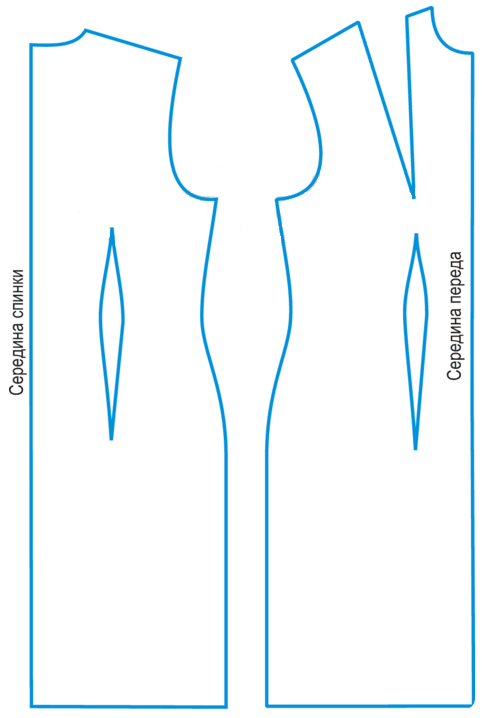
This is what the drawing itself looks like, to which this instruction is attached. Focus on it if required.
Pattern formulas
- To calculate the width of the back: 1/8 of the circumference of the chest + 5.5 cm (for all sizes).
- To calculate the width of the armhole: 1/8 of the chest circumference - 1.5 cm (for all sizes).
- To calculate the width of the chest: 1/4 of the circumference of the chest - 4 cm (for all sizes).
There is also a formula for calculating the depth of the armhole, but the data obtained through it is in most cases inaccurate. Therefore, if you want the dress to sit like a glove, then measure the armhole yourself, without using additional calculations.
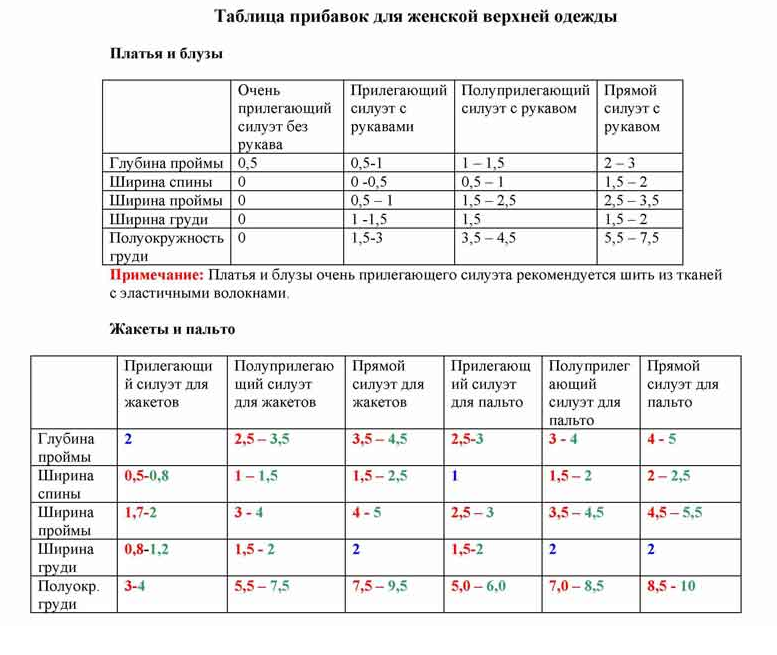
Before you start building a dress, you need to understand what silhouette it will be: free, fitted or tight-fitting. Based on this, you need to decide on the increments for the freedom of fitting. Look at the table and take the data that suits you. However, it is worth remembering that for a very tight dress, you need to choose elastic fabrics that stretch a lot. It is impossible to obtain such a silhouette from non-stretching materials.
- Draw a rectangle ABDC where height is the length of the garment and width is the half of the bust + the fit. For example, if the half-girth of the chest is 42 cm, then if you want to sew an outfit of a semi-adjacent silhouette, you need to take an increase from 1.5-2 cm: 42 + 2 = 44 cm. And so on.
- From point A, measure down the height of the armhole, not forgetting to add an increase in the freedom of fitting, mark the place with point G. From it, check the straight line until it touches the side BC and put G1.
- From point D to the right side, measure the width of the back, adding an increase in fit according to the table. From the resulting mark to the right, measure the width of the armhole. Draw perpendiculars to AB.
- Divide the armhole in half. From it, draw a straight line down to the very base. This is the side line.
- Divide each of the resulting two lines of the armhole into 4 equal segments, measuring crosses.
- From point A to the right, measure: 1/3 of the half-girth along the neck + 0.5 cm, and raise the point along a right angle by 2 cm.
- Point A and 2 are smoothly connected by a curved line, forming the neck of the back.
- On the line of the armhole of the back, where the crosses were outlined, measure down 1 cm from above if the shoulders are straight, or 2 cm if sloping. From point 2 (neckline) through mark 1 (2), draw a straight line equal to the shoulder line, taking into account an increase of 0.5 cm.
- Measure 2 cm from the bottom corner of the armhole, at a right angle and mark point 2.
- Draw the armhole going through: the shoulder point, the second and third auxiliary marks, point 2 and the top of the side line.
- Now move on to the front of the dress. Draw a straight line from point Г1 upward: 1/2 half-girth along the chest (without increments) + 0.5 cm. Set point Ш. From the last point to the left, draw a line, while increasing the auxiliary line of the armhole so that the latter and the line from point Ш connect ...
- Measure from point W to the left: 1/3 of the half-girth along the neck + 0.5 cm (draw the same measure from point W to the inside of the pattern, dividing the angle into equal parts). Measure 4 cm from the marked point. Measure 1 cm down from mark 4 and connect to the edge of the neckline.
- From point W down, measure: 1/3 of the half-girth of the neck + 1.5 cm.Connect the three marks with a curved smooth line, outlining the front neckline.
- Draw a straight line from point 1 (shoulder of the shelf) down to chest level, shifting the end point 1 cm to the right. This is the right side of the brisket dart.
- Divide the drawn line equally, and from the center, at a right angle, draw the difference between the half-grips along the chest above the chest.
- The missing side of the breast tuck is drawn from the base of the right, through the point of difference in the half-girth of the chest. Its length is identical to the right one.
- Connect the top of the left dart with a dotted line to the upper armhole division mark on the back. On the drawn line from the top of the dart, measure: shoulder length - 4 cm. Lower the mark 2 cm lower and connect it to the top of the left dart.
- From the point of the shoulder (2), lower the dotted line, connecting it with the lowest point of dividing the armhole of the shelf. Divide the dotted line in half, and measure 1 cm from the place of division to the right.
- In the lower corner of the armhole of the shelf, divide in half, set aside 2 cm.
- Using a neat curved line, draw the armhole of the shelf, through the points: 2, 1, the lowest point of division, 2, the middle of the side.
This completes the construction of the top of the dress. Next, start building the rest of the pattern.
- From point A, measure down the length of your back. Mark with a point T, and draw a horizontal line to the BC side, placing a mark T1. This is the waist line.
- Measure 20-22 cm down from point T and mark with point L (the indicator is relevant for all sizes). Draw a horizontal line to the BC side and set point L1. This is the hip line.
- Calculate the darts. Bust half - waist half. The resulting difference should be closed in darts. This is done according to the following scheme: 1/3 goes into the side darts, the rest is divided between the back and the front, while a little more than the shelf is always removed from the back.
- At the place where the side line intersects with the TT1 line, measure the borders of the darts to the right and left. Connect the marked points with the mark of the middle of the armhole with a straight line. From the waist line, round the hips at the side line, drawing it to the base. This creates a side seam line.
- Divide the back width in half and draw a straight line down to hip level. Measure darts at the waistline on each side. Measure 3-4 cm from the armhole line along the dart line, and step back 2 cm from the thigh line. Connect the marks that have arisen by drawing the dart of the back.
- Build the front of the dress. From the bottom of the bust dart, lead a straight line to the hip line. At waist level on each side, set aside the measure of the front dart. From above along the drawn line, retreat 5-6 cm.Connect the points, forming a dart.
The dress pattern base is completely ready! Now you can proceed to the most enjoyable, to cutting and sewing the product itself.
Sleeve pattern for dress
Some dress models require a sleeve. By building the sleeve pattern once, you can model different styles, including the popular flashlight sleeve.
To create a drawing you will need:
- back length;
- shoulder length;
- 1/2 neck circumference;
- 1/2 chest circumference;
- 1/2 circumference above the chest;
- 1/2 thigh circumference;
- the length of the sleeve;
- 1/2 wrist circumference.
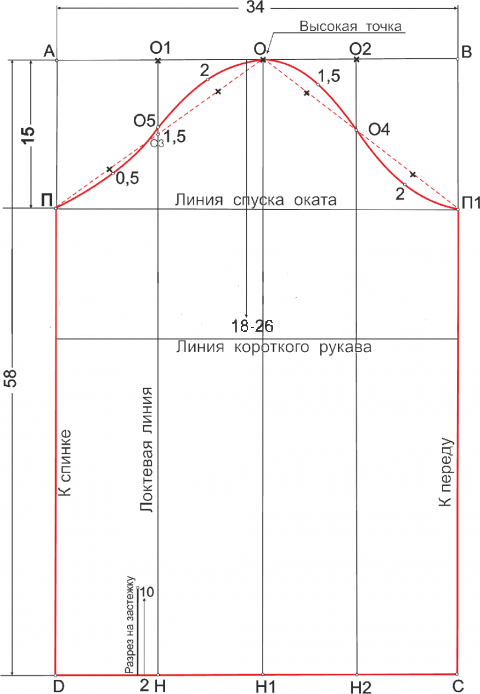
- Draw a rectangle ABCD. Lines AB and DC are equal: 1/3 of a semicircle along the chest + 1 cm x 2. Lines AD and BC are equal to the length of the future sleeve.
- From point A, measure down 3/4 of the armhole height. Mark with a point P and draw a straight line until the touch of the side of the BC, marking with a point P1.
- Divide the AB line into four equal parts and draw segments from the identified points to the DC side. Name the points as shown in the diagram.
- Connect point O with a dotted line with P and P1. Put point O3 on the line of intersection О1Н.
- On the O1H segment, raise the intersection point O3 1.5 cm higher and designate it as O5.
- Divide the segment PO3 in half and measure down 0.5 cm, marking with a dot 0.5.
- Divide the O3O segment in half and measure up 2 cm, marking with a dot 2.
- Divide the OO4 segment in half and set aside 1.5 cm upwards, marking with a point 1.5.
- Divide О4П1 in half and measure 2 cm down.
- Connect the marked marks with a curved smooth line, as shown in the image.
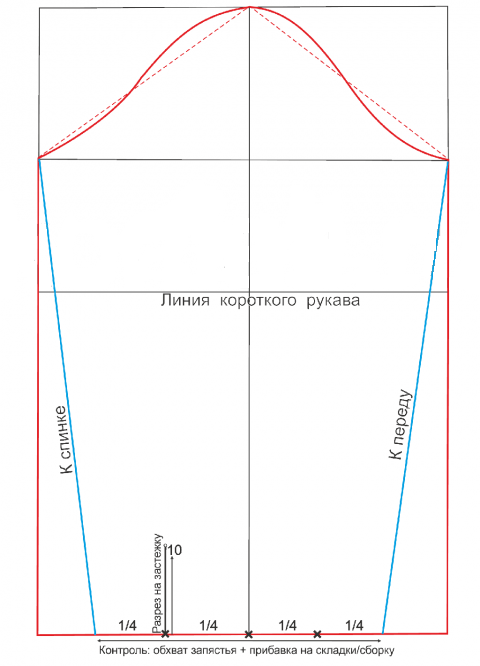
The sleeve pattern is ready. If you want to make it shorter, just move the bottom line to the required distance, as shown in the diagram.
To taper the sleeve, measure half the difference between the sleeve and wrist widths on both sides of the sleeve bottom. And then draw lines from the armhole to the resulting points as seen in the diagram.
Dress Pattern: Modeling
Now the promised simulation example. Many people consider this process difficult and subject exclusively to professionals, but this is far from the case, and now you will see it.
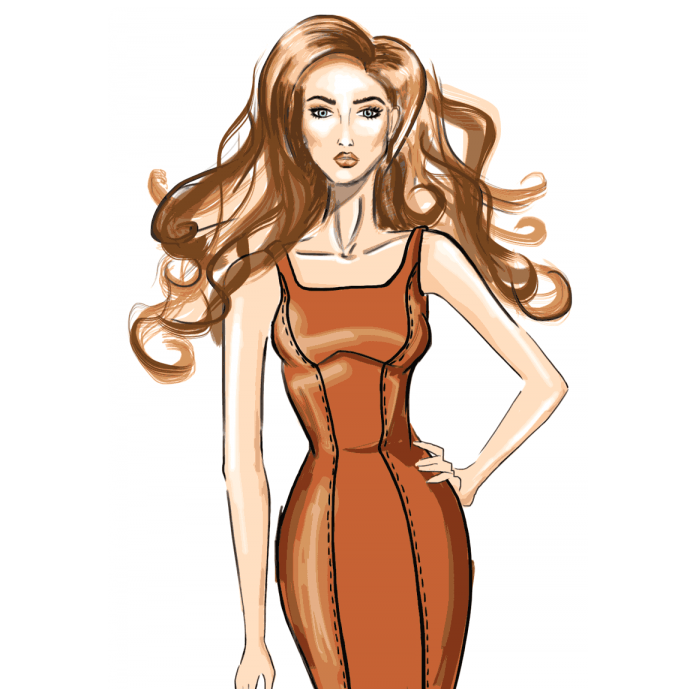
Let's consider how the pattern of a dress with embossed seams "Princess" is built, based on the existing base patterns.
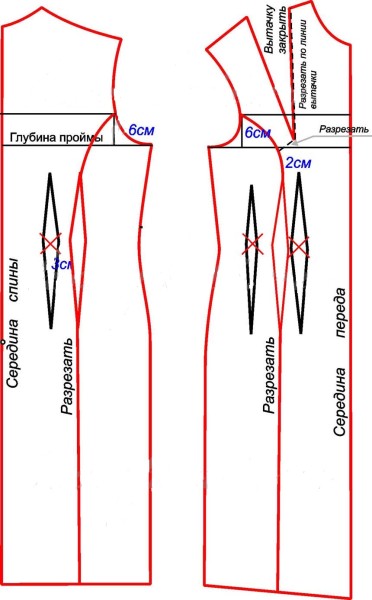
- The darts must be shifted: 3 cm to the right on the back, and 2 cm to the left on the shelf.
- On both halves, retreat 6 cm along the armhole.
- Connect point 6 with the tops of the darts with a smooth line, and draw lines from the ends of the latter to the hem of the dress.
- From the point of the bust dart, cut a line to touch the curved line 6-2. Along this line, the pattern will need to be cut to cover the large bust dart.
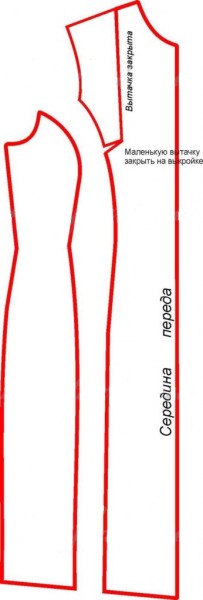
- Cut out the pattern and then close off the large bust dart. The resulting small dart must be closed already when transferring the parts to the fabric.
You need to cut out the parts according to the following principle:
With the help of such a dress, you can visually correct the figure, especially if you pick up two materials contrasting in color. For example, cut the sides from black fabric, and the center of the back and front from beige.
As you can see, modeling is not at all complicated, but, on the contrary, a rather entertaining creative process. Turn on your imagination at 100% and create unique, inimitable masterpieces!
